|
|
Post by gameandwatch on Jul 17, 2017 20:41:24 GMT 2
Hi guys
Last year I bought a rare NES m82 (12 module demo unit in stores) which I had to refurbish and do also some repair, and my own "design".
It was a long time project, as I had only short time slots to spend on it, and also the research for the spare parts, data sheets etc. was always challenging
I have now some know how and can maybe give a hand to someone which needs advice (no guarantee, but I will give a try for your issues..)
I am very near to finish the Project X (details are missing, in the next few weeks it's done!)
My question, is someone interested in the pics, tips and hints, and want's to see the complete finished m82 unit?
If yes, I will do the effort of wrtitting the posts and also taking pictures, if not then for sure I will not spend my time on that
let me know folks
cheers, gameandwatch
|
|
|
|
Post by ash888 on Jul 17, 2017 23:43:18 GMT 2
Hi guys Last year I bought a rare NES m82 (12 module demo unit in stores) which I had to refurbish and do also some repair, and my own "design". It was a long time project, as I had only short time slots to spend on it, and also the research for the spare parts, data sheets etc. was always challenging I have now some know how and can maybe give a hand to someone which needs advice (no guarantee, but I will give a try for your issues..) I am very near to finish the Project X (details are missing, in the next few weeks it's done!) My question, is someone interested in the pics, tips and hints, and want's to see the complete finished m82 unit? If yes, I will do the effort of wrtitting the posts and also taking pictures, if not then for sure I will not spend my time on that let me know folks cheers, gameandwatch I would love to see some before and after pics! Always thought the m82 was really cool. |
|
|
|
Post by gameandwatch on Jul 18, 2017 21:03:28 GMT 2
Hi Ash thanks for your reply, with pleasure then  let's start with some pics I took before, unfortunaletly I did not on all steps or positions of the m82 pictures. You see following things: 1) initial Unit picture of the front 2) picture of the housing 3) picture of the housing 4) power AV-AMP module disassembled 5) broken Rotary timer switch (dismounted from m82 unit) 6) broken/rusty screws outer side of housing 7) missing screws on inner main pcb 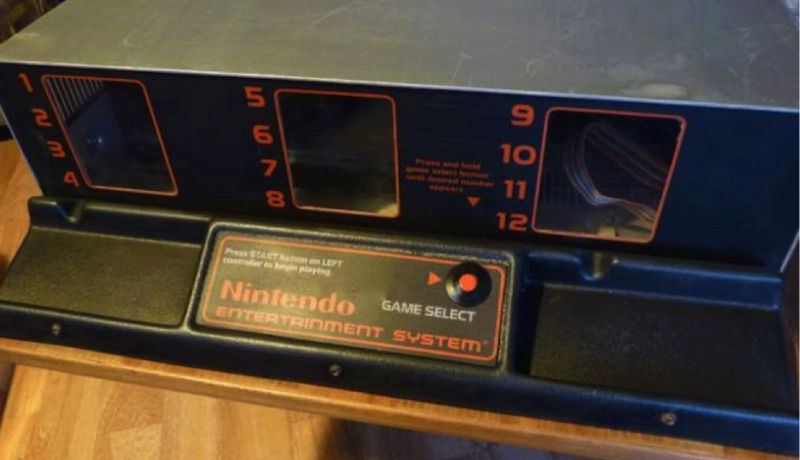 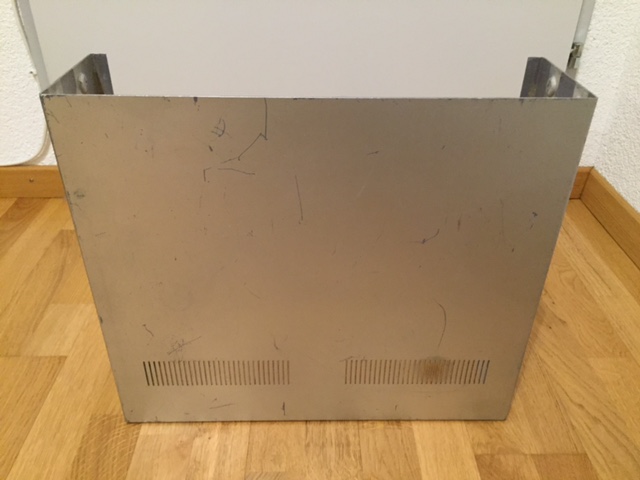 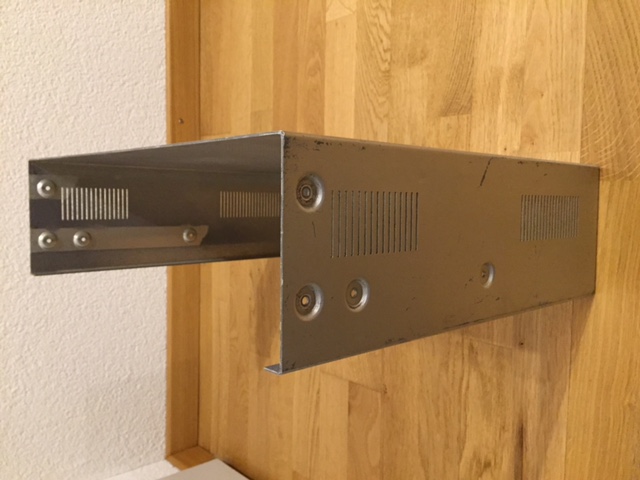 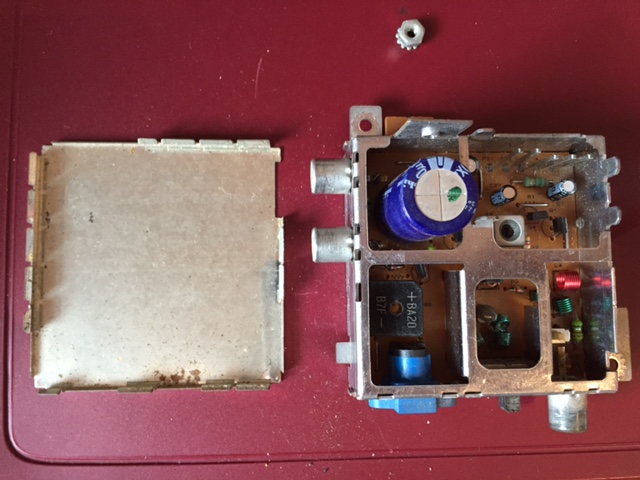 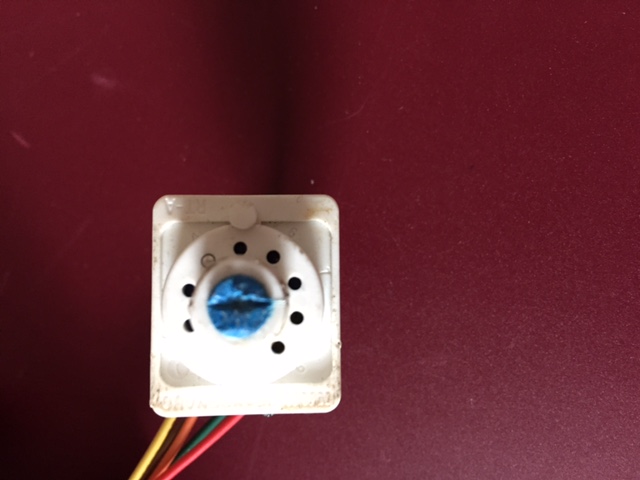 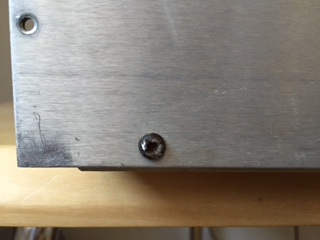 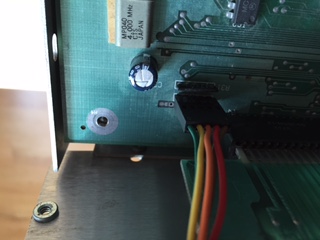 |
|
|
|
Post by gameandwatch on Jul 18, 2017 21:11:05 GMT 2
next pictures will be soon. I will give some info & pics of this:
1) pics during reparation & tests
2) showing some spare parts
3) special setup of IRQ
cheers, gameandwatch
|
|
|
|
Post by gameandwatch on Jul 18, 2017 21:33:55 GMT 2
The unit itself were running with some issues on electrical side, but also mechanical parts were broken or missing I had also first to get some tools (solder station, multimeter). - Rotary timer switch was always on max. timer (128min), moving position to the other timer settings was no more possible and functional (30sec, 3min, 6min, only 128min) - Screws were missing, broken or rusty, this on inner and outer side, I saw that some screws will be a big challenge to take them out of the pcb & housing - housing was hardly scratched (I knew I want to do something on the look & feel!), I wanted my "own" special NES m82 unit - not all games were/are running (that's not a defect, CIC chip protection from Nintendo), I wanted from the beginning to make the IRQ fix, but how?! - very dirty components on the inner pcb & slot modules - the Caps on the main power supply were already replaced, which was very good news! If they blow up, then the unit gets serious troubles! - and then some small issues here and there, don't remember everything, but I spent all in all so many hours of work cheers, gameandwatch |
|
|
|
Post by ash888 on Jul 20, 2017 7:16:42 GMT 2
The unit itself were running with some issues on electrical side, but also mechanical parts were broken or missing I had also first to get some tools (solder station, multimeter). - Rotary timer switch was always on max. timer (128min), moving position to the other timer settings was no more possible and functional (30sec, 3min, 6min, only 128min) - Screws were missing, broken or rusty, this on inner and outer side, I saw that some screws will be a big challenge to take them out of the pcb & housing - housing was hardly scratched (I knew I want to do something on the look & feel!), I wanted my "own" special NES m82 unit - not all games were/are running (that's not a defect, CIC chip protection from Nintendo), I wanted from the beginning to make the IRQ fix, but how?! - very dirty components on the inner pcb & slot modules - the Caps on the main power supply were already replaced, which was very good news! If they blow up, then the unit gets serious troubles! - and then some small issues here and there, don't remember everything, but I spent all in all so many hours of work cheers, gameandwatch That's a lot of issues. I hope you found it for a good price. |
|
|
|
Post by gameandwatch on Jul 20, 2017 17:56:45 GMT 2
there are a few points to mention on the "price" - NES m82 are always expensive, you get them only for a low price, if the seller does not know what he has in his hands - mine came from a very friendly collector from France (thanks buddy if you see this ) - Even more broken, partly working m82 are still very pricy, due to it's rarity on original spare parts, and you can fix them with not original pieces if needed - e.g. power supply, or video Amp, cables, even the CPU - Always look on what works and what is broken, I was confident that I can handle those issues - but yes a ceratin discount was there if I compare it to the full working units (with all games inside & accessories) on eBay which goes - 2000 to 3000 bugs and sometimes more. The better the units condition the higher the price, just as G&W - I was lucky as the mechanical parts such as the front acryl, all inner slot modules, inner backplane, and outer plastic front side, were in preety good shape - those parts can not be easily replaced, they are Nintendo m82 unique! - in fact I did not yet a full calculation on all I bought to fix the unit (tools, spare parts, color painting, controllers, cables,....) - I will do that to see were I will land, I just won't count my personal working hours, only the investment itself and material cost to fix all  |
|
|
|
Post by gameandwatch on Jul 20, 2017 18:27:36 GMT 2
here first a picture of the power supply - it worth to mention the PSU, as the big electrolyte Caps were already replaced, you have to do that to avoid that they dry out and blow up - also the PSU is well designed, it runs on either 110VAC @60hz & 220VAC @50hz, just be sure you put the plug right !!!! As mine came from France, it was set right 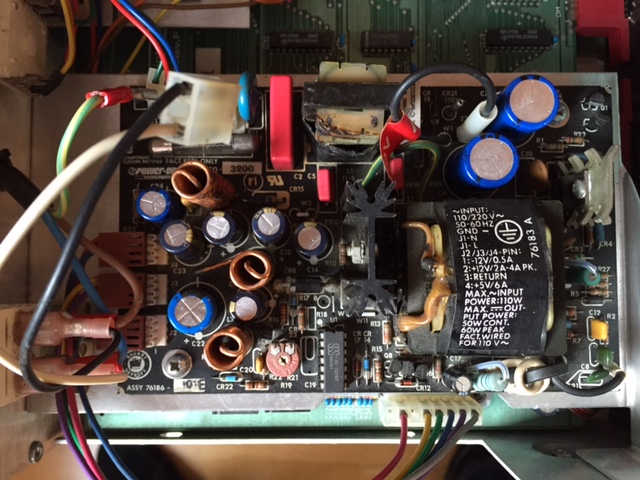 |
|
|
|
Post by ash888 on Jul 22, 2017 1:24:36 GMT 2
there are a few points to mention on the "price" - NES m82 are always expensive, you get them only for a low price, if the seller does not know what he has in his hands - mine came from a very friendly collector from France (thanks buddy if you see this ) - Even more broken, partly working m82 are still very pricy, due to it's rarity on original spare parts, and you can fix them with not original pieces if needed - e.g. power supply, or video Amp, cables, even the CPU - Always look on what works and what is broken, I was confident that I can handle those issues - but yes a ceratin discount was there if I compare it to the full working units (with all games inside & accessories) on eBay which goes - 2000 to 3000 bugs and sometimes more. The better the units condition the higher the price, just as G&W - I was lucky as the mechanical parts such as the front acryl, all inner slot modules, inner backplane, and outer plastic front side, were in preety good shape - those parts can not be easily replaced, they are Nintendo m82 unique! - in fact I did not yet a full calculation on all I bought to fix the unit (tools, spare parts, color painting, controllers, cables,....) - I will do that to see were I will land, I just won't count my personal working hours, only the investment itself and material cost to fix all Looks like there are a few on eBay between 3500 and 7000 usd. Is the m8 different than the m82? |
|
|
|
Post by ash888 on Jul 22, 2017 1:30:04 GMT 2
here first a picture of the power supply - it worth to mention the PSU, as the big electrolyte Caps were already replaced, you have to do that to avoid that they dry out and blow up - also the PSU is well designed, it runs on either 110VAC @60hz & 220VAC @50hz, just be sure you put the plug right !!!! As mine came from France, it was set right I have a Mario Bros. arcade cabinet that worked fine for awhile but the screen started to get weird. I was told it needs a new cap kit, but I didn't have the time or motivation to put it in. Also, I heard you need to discharge the monitor before poking around in there or you can get shocked. Eventually I'd like to tear out all the old hardware and make it into an awesome MAME cabinet. |
|
|
|
Post by gameandwatch on Jul 22, 2017 18:23:03 GMT 2
Looks like there are a few on eBay between 3500 and 7000 usd. Is the m8 different than the m82? m8 ? Never have seen that one, however there is a Japanese demo unit which is a bid different, but normally less expensive than the m82, you have a link? |
|
|
|
Post by gameandwatch on Jul 22, 2017 18:51:08 GMT 2
I have a Mario Bros. arcade cabinet that worked fine for awhile but the screen started to get weird. I was told it needs a new cap kit, but I didn't have the time or motivation to put it in. Also, I heard you need to discharge the monitor before poking around in there or you can get shocked. Eventually I'd like to tear out all the old hardware and make it into an awesome MAME cabinet. man, your cabinet is so great ! Love it, I am also looking for one, just missed one on ebay from Austria  ok, so transformer/Caps of the CRT are bigger (output voltage for the tube/Capacity) and so also more dangerous than the once in the m82! So yes, please do not touch anywhere if you are not familiar, the reason is, that the old tube screens needs high voltage to build up the "picture-lines". The caps can be charged for a long time ! So be sure, to discharge everytime you do repair/maintenance, otherswise do not manipulate. I used to work a lot with high voltage, but at home I have huge respect for that! Your idea is good, there are flat screens especially for Arcarde cabinets which can "simulate" the picture as a CRT (not as good as a CRT, but close enough to get happy with). Old CRT's can sometimes also take fire if they don't operate properly anymore, my old CRT (Bang & Olufson is always turned off the 220 plug if I don't play) with the m82 you have "only" to handle 220VAC, otherwise there is no danger inside the m82 I just got shocked one or twice, was clearly my fault, touched by mistake the PSU when I did some measurements on the main pcb for the rotary switch fix |
|
|
|
Post by gameandwatch on Jul 22, 2017 19:24:33 GMT 2
again time for some pics during reparation, restoration, spare parts: 1) old screws from outer side (inner square head!) & new screws in the same look & dimensions (not square head as I have no tool and nowadays no more available), that was a challenge, I gote 2 times the wrong once... (inch not metric!) 2) old and new rotary switch, the new one is also an original Nos rotary switch! No copy, got a while to find that one, there are so many version of it, be careful, not every switch will work, they look the same, but may not fit...for the switch I had to study the data sheet which I found online 3) shows date 1987 on the pcb, nice   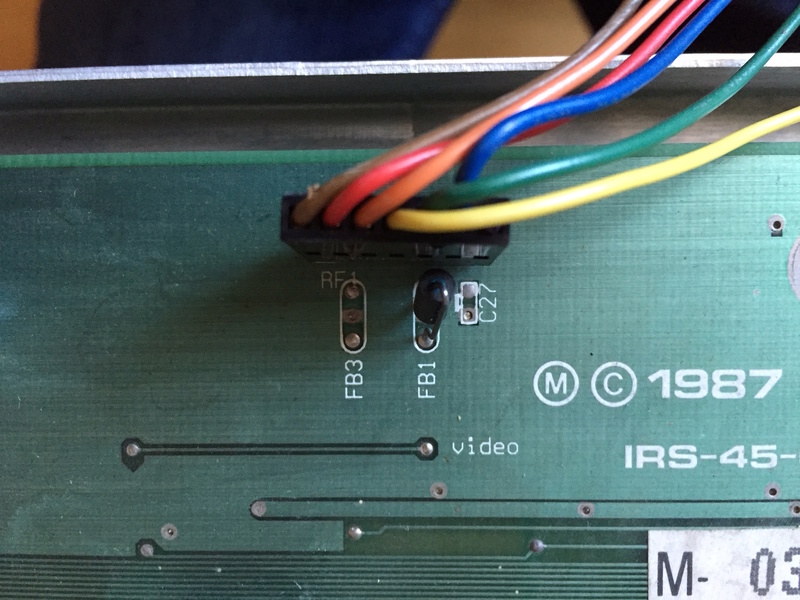 |
|
|
|
Post by ash888 on Jul 22, 2017 23:27:36 GMT 2
I have a Mario Bros. arcade cabinet that worked fine for awhile but the screen started to get weird. I was told it needs a new cap kit, but I didn't have the time or motivation to put it in. Also, I heard you need to discharge the monitor before poking around in there or you can get shocked. Eventually I'd like to tear out all the old hardware and make it into an awesome MAME cabinet. man, your cabinet is so great ! Love it, I am also looking for one, just missed one on ebay from Austria ok, so transformer/Caps of the CRT are bigger (output voltage for the tube/Capacity) and so also more dangerous than the once in the m82! So yes, please do not touch anywhere if you are not familiar, the reason is, that the old tube screens needs high voltage to build up the "picture-lines". The caps can be charged for a long time ! So be sure, to discharge everytime you do repair/maintenance, otherswise do not manipulate. I used to work a lot with high voltage, but at home I have huge respect for that! Your idea is good, there are flat screens especially for Arcarde cabinets which can "simulate" the picture as a CRT (not as good as a CRT, but close enough to get happy with). Old CRT's can sometimes also take fire if they don't operate properly anymore, my old CRT (Bang & Olufson is always turned off the 220 plug if I don't play) with the m82 you have "only" to handle 220VAC, otherwise there is no danger inside the m82 I just got shocked one or twice, was clearly my fault, touched by mistake the PSU when I did some measurements on the main pcb for the rotary switch fix Yeah, as much as I love the original hardware, I'm thinking it would be better to convert it into a MAME cabinet for multiple reasons. I'm not familiar with discharging old monitors so I think I'll take your advice and pass. But to remove the hardware, isn't there still a shock risk? So 220v is used in Europe? Here we use 120v for the most part but sometimes 220v. In Japan they use 100v. |
|
|
|
Post by ash888 on Jul 22, 2017 23:29:49 GMT 2
|
|


 let's start with some pics I took before, unfortunaletly I did not on all steps or positions of the m82 pictures. You see following things:

 The game itself however is in superb condition (not even a scratch). If it is the game you need, I have it right here.